The bottom line: I love the bike! (Although to be perfectly honest, as of this writing, I still haven’t ridden it yet. I’m waiting for the roads to clear of ice, sand and salt.) Warning: What follows is a fairly detailed description of the building of the bike. Unless you are interested, I would not blame you for stopping here, or skipping to the very end for the parts list and a photo.
When last we left off, I had just picked up the frame from the Ride Studio Cafe in Lexington. On the way home, I stopped by The Bikeway Source, my local bike shop here in Bedford, to show them the goods. They were going to build this frame into a bike.
The shop is owned by Eric, managed by Chris, and wrenched mostly by Randall. I have bought all of our bikes there, except my first, and they have taken very good care of me. I believe strongly in supporting your local bike shop, and Bikeway Source makes that easy, which is why I wanted them to complete the bike.
They are very close by (a 2 minute ride), very accommodating and competent, and I trust them. Also, every time I’ve checked, their pricing is competitive. Maybe not the absolute cheapest I can find, but I value having a local shop where I can talk to a knowledgeable person and touch and feel the goods before I buy.
As you can imagine, there was a lot of discussion and thought over every little detail. Chris took charge of my bike from the beginning. He (and Randall) listened to what I was looking for, made suggestions, then came up with an excellent recommended parts list, which called for decisions from me on almost every item.
Plus, many of my knowledgeable biker friends chipped in with numerous technical tips. For example, while searching for the best climbing gears, my friend Rob recommended an FSA 30/46 chain ring. I looked at the parts list Chris had compiled, and there it was.
Chris gave me a choice of 3 rims. Gary, a friend & bike touring mentor who is currently a few weeks into his second cross-country ride, put Velocity Dyad rims on his new bike. That too was one of Chris’s suggestions, so that is what I got.
I had procrastinated on making several final decisions, especially about the wheels, so Chris had not yet ordered all the parts. Now that the frame was in hand, I made the final selections. Finally he was able to order all the stuff.
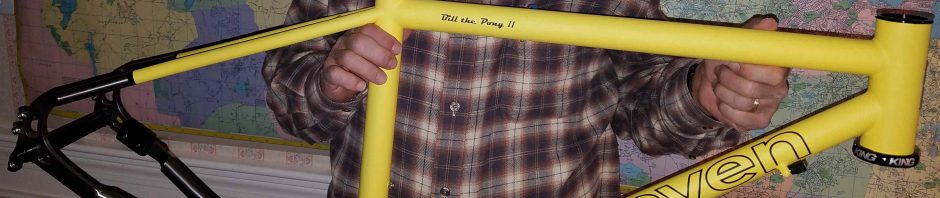
Meanwhile, I took the frame home to caress and show to my friends. It is beautiful. It will never be this pristine again. There are more photos at this previous blog post.

On January 19, I took the frame and fork back to the Bikeway Source, along with the seatpost and a bag of parts (bottom bracket and headset bits), all of which came from The Ride Studio.
All the parts, except the wheels, were in and ready to be hung on the bike. I wanted to watch, to which they were amenable, so we decided on this particular Saturday afternoon for the build.
I have never seen a frame get built up from scratch. It was interesting. Randall did most of the work, with Chris helping as necessary. (It was a busy weekend afternoon. This is cross-country ski season for them.) I hung around for a few hours watching while they installed the seat post, bottom bracket, and headset. Then I went to lunch, and when I returned, the handlebar, brakes and brake levers were on. But there was a hitch. Turns out due to a miscommunication somewhere along the line, the wrong size bracket had been ordered for the front derailleur, so it could not be installed. Not a problem, since there was no rush.
Chris ordered the correct bracket and set the bike aside. A week later the derailleur bracket arrived. During that time, they had discovered that the bottom bracket did not fit properly. It turns out that the Chris King bottom bracket was not quite as compatible with the FSA crankset as the catalog would indicate. Chris swapped that for an FSA bottom bracket, which by all accounts is also a very good unit at half the price of the Chris King. I’ll tell you in a year or two how that works out.
Chris was going to build my wheels, once I finally decided on the components (Velocity Dyad rims, Chris King hubs, and 32 round steel spokes per wheel, black). But in the end he sub-contracted the work to QBP, which he says resulted in just as good a set of wheels for less money and faster delivery. They seem to be pretty good wheels. After the ride I’ll tell you how they are. They look bulletproof, so I am optimistic. I will be carrying spare spokes, just in case.
After a lot of agonizing, I decided to ride on Continental Gatorskin 700×32 tires. Until they arrived, Chris threw on a set of Maxxis 700×32’s so they could do the final setup, which required the bike to be on tires. He then gave them to me – told me to just keep them. Thanks! They look like nice tires. I will ride those until just before my trip, when I will put on the Gatorskins. I am going with the Gatorskins on the ride because Gary and others say they got very few flats with them.
Finally, on Wednesday, February 13, I picked up the finished Bill the Pony II from the bike shop. It was actually ready for pickup some days prior, but Chris wasn’t going to be in the shop at a time I could get there, so I chose to wait.
Once getting it home, I waited a few weeks before mounting the fenders and racks, hoping to first ride it unencumbered. But the weather has not been cooperative (I have instead been riding my current bike), so I decided to mount all the auxiliary stuff. (I can ride it without racks and fenders just before I pack it to ship out to San Jose.)
The bike shop offered to mount the fenders and racks, but I wanted to do that myself, for the experience. Glad I did. The fenders went on first. The instructions were pretty sparse (in 5 different languages), so it was not at all obvious even how to begin. Fortunately a YouTube video came to the rescue, and in the event, they mounted with no problems. The installation required cutting the steel fender stays to the proper length, so my friend Tom let me borrow his bolt cutters for the task, rather than requiring me to use a hacksaw. Even so, there was no installing either the fenders or the racks without a well equipped workshop.
After getting the fenders in place (before I trimmed the stays), I then installed the Tubus racks. Gary had warned me that the stays for the rear rack might be too short, but that turned out not to be an issue.
The only things left for me to mount are the three bottle holders, rear view mirror, lights (front & rear blinkies, and my headlight), bike computer (still to be determined, but leaning towards a simple wired Cat Eye Strada Cadence), and the bags (2 front panniers, 2 rear panniers, and 1 handlebar bag).

There will be more and better photos to follow.
Parts List
- Frame: Seven Cycles ExPat S Custom Titanium
- Fork: Waterford steel Uni-Crown
- Stem: Seven aluminum 3D forged ultralight, black
- Handlebar: FSA Gossamer Wing, black aluminum
- Seat Post: Thompson Elite, black, set back
- Seatpost collar: Problem Solvers, black aluminum with rack mounts
- Headset: Chris King Inset 7
- Bottom bracket: FSA
- Derailleur: Shimano Ultegra 2×11
- Chainrings: FSA 30/46
- Rear Cogs: Shimano 105 11 speed 11-34
- Chain: Shimano Ultegra 11 spd with QuickLink
- Rims: Velocity Dyads
- Hubs: Chris King
- Spokes: DT Comp, 32/wheel
- Cranks: FSA SL-K 386 EVO, hollow carbon, 172.5 mm
- Brakes: Spyre SLC mechanical disks
- Rotors: Shimano XT 160mm
- Pedals: Crank Brothers Eggbeaters
- Saddle: Specialized Body Geometry (new 7 years ago for my ride to Harrisburg)
- Handlebar tape: Fabric®, black
- Thermometer: Stem CAPtain
- Fenders: SKS Bleumel Commuter II
- Rear Rack: Tubus Logo Evo
- Front Rack: Tubus Tara

Dan, Interesting description. One comment. The Cateye wired Strada is a good, dependable computer. However, I wouldn’t bother with the cadence option. On a loaded tour, your cadence is what it is. The extra wiring is just a nuisance. On my previous transcontinental trip I used a Cateye Strada wireless as a backup to my Garmin Edge 500. The Strada wireless was inexpensive and completely trouble-free. Gary
Sent from my iPhone
>